Build Log - October 2020
Here it is, ya'll. I have the Lego Grand Piano https://www.lego.com/en-us/product/grand-piano-21323, and I'm about to start building it.
I have been excited about this one for a long time, and have been waiting to get this set. It finally arrived last week, thanks to a friend with the hookup, but then we had gaming scheduled, so I didn't have the table available. But today, the table is mine, and today, we begin.


Inside the inside box... all the extra pieces not in numbered bags were in there, and mostly the smaller pieces, and the book - helped to keep the book flat and not curling up, at least

If you find this one at all interesting, I suggest this video, where they PULL THE ACTION OUT OF A REAL PIANO to compare it to the Lego version. It was really neat to watch: (https://youtu.be/XibOWwz_0Jg)
Aw, they start the book with "Ladies and gentlemen and everyone in between..." They really did build this one for me!
The piano has 3662 pieces - that's a lot. The Disney Castle was a little over 4000 pieces, and the Apollo Saturn V was under 2000 (for context). But in the book, it ways 2787 pieces, so looks like there's a misprint there, or a change in plans after the book intro was done.
It's build size will be 8.5" x 12" x 13.5". And it will have a 25-key board - that's two full octaves with three C's.
This will also be my first build that uses power elements - to 'play' the keys. It interacts with a phone app to 'play' music, like a player piano!

Also, if you notice the sheet of paper I've stuck in the book - that's a printout of a screenshot from the video I shared above. In that video, they note that the keys don't lay quite perfectly even at rest, but the creator of the piano came up with a retrofit solution for that. And I'll be using his solution when I build the piano.

Bag #1 is complete (actually three bags, all marked '1') - I think I've built some of the board that makes up the bottom of the piano? Time will tell.

The three bags for Step 2 are done, and this is where the real magic comes from to work the piano. This bar makes the keys move. I did make a change on the build, based on advice from that video up above. The build designer suggested a change from the plans that would make the keys line up a little better.
The bar has one cog, which is hooked to a rotating electronic piece. That one - and another electronic piece - are both plugged into that gray-and-white battery pack. This is what makes everything do the things.

IT'S ALIVE!!! A short video of the inner workings for you

And with it set on top of the action bars, you can really start to get a sense of just how big this build is (almost as big as the Disney castle, by piece-count). This piano is going to be a very noticeable size on display.


I wanted to share this ugly little piece. On it's own, it's very unappealing. But when the larger piece I'm working on is turned on its side, and the little weird bit is popped on it, as you can see in the back, it fits neatly into the curved pieces and is quite nice.


With Bag Set 5 (of 21+) now complete, the back of the piano is finished off and connected to the rest. The body of the piano is largely done, with a soundboard over the powerboard, the power functions in place, and lots of gold detail for 'sound holes' and clips ready to hold the 'strings' - even a number of 'tuning knobs' around the board. This is already very pretty and appealing.
Also, my fingertips hurt now from pressing down on all those little claw-clips - 39 of them.

Bag Set 6 is done. I'm not even certain what I'm building at this point. I suspect it's the tray that holds the keys, and it will be turned around. What's at the top will be down facing the player, and the black on the sides and bottom will be toward the back sliding into the piano.


It looks like a piano now, ready for the key assembly.


It makes the door able to lever out from the side of the piano, not like a typical hinge, but very interesting. And allows the piece to be closed at an angle to the bricks so that it matches up to the side of the piano better.
With the door closed, the side of the piano is finished. It's not invisible, but it blends nicely.

Here's a fun shot of the inside workings of the piano before more parts cover up the view. The instructions had me test the action at this point, especially the key reset function. And now I see why we replaced that one part earlier and why there's a fairly loose gray piece kinda sticking out over on that side.


The front view of the pedal tower assembly, and a good shot generally of the underside of the piano and the legs/wheels.


And finally, the baby is standing on her own three feet!


All the white keys for one half-octave, minus one bit of white tiling, so you can see that joint.


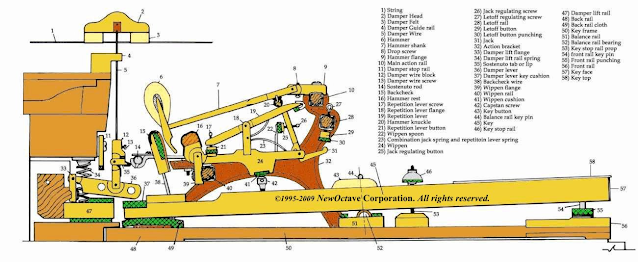
 We have our first full octave completed... and a side view to see the hammers and the weight clearly.
For an understanding of how the keys, hammers, and dampers look on a piano, a graphic from https://pianoworld.com/.../Images_for.../Grand_Action.jpg.
Repeat the half-octaves a couple of times, and now we have a complete two-octave keyboard, ready to install!


This is after the disaster. Because of course every build has a disaster. See, I put the full keyboard in, and then turned on the player function. After resetting, the keys didn't line up well. So I thought I'd try to fix that before I went any further. I knew better, but yet...
You may remember the incredibly intricate bar with all the bits and bobs that was almost the first thing built? You know, Bag Set 2 (we have just now finished Bag Set 15). Yeah, that's what controls how the keys reset. In fact, I changed out a piece on the recommendation of the video I linked at the outset - a change suggested by the designer. Well, the keys still didn't line up well on reset. So I started taking off parts of the build to get to that far left piece on that bar. The very first piece on it. The hardest to get to. I took off the strings, the back flat, the door panel. I got to it, and I adjusted it. Didn't get the effect I wanted. I put back the official piece there. Nope, not that one either.
Through taking the bar off and putting it back on a dozen times, I also knocked the back piece off the table. A few bits went flying. And then a leg collapsed. A few more pieces flew across the floor. I stabilized everything as best I could, got the piano set down, picked up the pieces and started rebuilding.
It took a lot of rebuilding. But I did it to myself. So it's back the way I originally built it, with the designer's post-change, and the keys still don't line up on reset the way I want them to. And I'm going to have to live with that. Oh, and of course there is a curved piece, tan, that I couldn't find where it went back. So there's a piece missing, somewhere inside the piano. And it will stay missing.


The face of the lid has a nice printed piece that says 'Lego' in script. This is traditionally where the piano manufacturer's name is printed. So it's a nice touch. And it has red 'felting' on the bottom of the lid, where it will rest at the top of the keys.


The lid closed over the piano keyboard.


And the music shelf - can easily be removed, like the real ones, and uses a couple of angled grills to change the angle of the back. It will hold tiny music, or a phone with music on it.


And the piano itself is done! Here it is in a variety of 'poses':
- With the lid installed and fully closed.

- With the lid propped fully open.
- And with the lid at a half-prop.

The stool is complete. It is just as complex and cool as the piano itself - the knobs on either side raise it up and down. And that whole top part is actually upside-down, while the bottom part is not. So that's neat - the two parts are connected by the mechanics that roll it taller and shorter.

Here she is in her new display home, with my electric piano in the background - you know, for company.

No comments:
Post a Comment